Guest Page Info
Providing detailed information about the wedding venue on the guest page can help make the wedding experience more enjoyable and stress-free for guests, while also ensuring that everyone is well-informed and prepared for the event. This post will walk you through the process of setting up the wedding guest page to make your guests’ experience more enjoyable.
Wedding Venue
a) Detail information or guides to the venue
Guests may not be familiar with the area, so providing them with detailed directions to the venue can make it easier for them to find their way. This can help to reduce stress and ensure that guests arrive on time.
For example, if your wedding will take place in a large venue with several floors or halls, adding the name of the floor or hall on the guest page may help guests navigate the venue and find the wedding location.
- Go to Settings from the side menu.
- Scroll down to Guest Page and click on the Guest Page Info.
- Include the name of the hall or the floor of the venue in order to help guests find the venue and navigate.
- Click Preview button to preview the changes.
- Make sure you click Save button to save the changes before you exit.


b) GPS navigation
Including GPS navigation can help guests save time and avoid getting lost on their way to the wedding venue. This is particularly important for out-of-town guests who may not be familiar with the area. Be sure to review and test the GPS navigation before sharing the guest page link with your guests.
- Go to Settings from the side menu.
- Scroll down to Guest Page and click on the Guest Page Info.
- Click on the Preview button on the top right side.
- Select the map you want to test and click confirm button to continue.
- Ensure that the GPS navigation directs guests to the correct venue.
- Click on the Edit button to choose the appropriate wedding venue, in case the GPS navigation leads to the wrong location.


c) Include parking information
By providing information on accessible entrances, parking, and accommodations, you can help ensure that all guests are able to attend and enjoy the wedding. You can include parking information on the guest page as steps below:
- Go to Settings from the side menu.
- Scroll down to Guest Page and click on the Guest Page Info.
- Scroll down to Remark field.
- Enter parking information according to your wedding venue.
- Click Preview button to preview the changes.
- Make sure you click Save button to save the changes before you exit.


Wedding Title
a) Personalised & Formatting
Including a wedding title or heading on the wedding guest page helps to provide a clear and concise summary of the wedding event. A well-crafted wedding title can also help to set the tone and mood of the wedding, whether it is a formal or informal affair, a traditional or modern event, or any other particular theme or style.
You can customised the wedding title on the guest page as steps below:
- Go to Settings from the side menu.
- Scroll down to Guest Page and click on the Guest Page Info.
- At the Wedding Title field, you have two options for the Wedding Title field. You can either use the same title as your wedding account or create a custom one.
- Click Preview button to preview the changes.
- Click the Reset button if you want to undo the changes to the wedding title.
- Make sure you click Save button to save the changes before you exit.


b) Include a wedding hashtag
Including a hashtag for a wedding can be a helpful way to organize and collect photos and memories from the event. When guests use the designated hashtag on their social media posts, it allows for easy searching and viewing of all photos and messages related to the wedding. Additionally, having a unique hashtag can be a creative and personal touch to the wedding and add to the overall ambiance and theme.
You can include a hashtag on the guest page as steps below:
- Go to Settings from the side menu.
- Scroll down to Guest Page and click on the Guest Page Info.
- At the Wedding Title 2 field, add your wedding hashtag.
- Click Preview button to preview the changes.
- Make sure you click Save button to save the changes before you exit.


Date & Time
a) Start time & end time
When guests have the start and end time, they can plan their transportation accordingly, make any necessary arrangements, and arrive at the venue on time. Moreover, end time details are also essential because it provides an idea to the guests about how long they can stay and enjoy the event. It helps guests to plan their departure time and prevents any unwanted surprises or confusion.
You can edit the wedding start time and end time on the guest page as steps below:
- Go to Settings from the side menu.
- Scroll down to Guest Page and click on the Guest Page Info.
- You can either use the same start time as your wedding account or create a custom one in the Start Time field.
- Include your wedding end time in the End Time field, for example 10:00 PM
- Click Preview button to preview the changes.
- Make sure you click Save button to save the changes before you exit.


b) Timezone
Including the timezone for a wedding is important because guests may be traveling from different parts of the world, and therefore may be in different time zones. By specifying the timezone, guests can avoid confusion and ensure that they arrive at the wedding at the correct time.
For example, if a wedding is taking place in New York but a guest is traveling from London, they may not be aware that there is a five-hour time difference between the two locations. You can include the wedding timezone on the guest page as steps below:
- Go to Settings from the side menu.
- Scroll down to Guest Page and click on the Guest Page Info.
- You can either use the same timezone as your wedding account or create a custom one in the Timezone field.
- To match the timezone with your wedding account, click on the Reset button.
- Click Preview button to preview the changes.
- Make sure you click Save button to save the changes before you exit.


c) Cocktail session
A cocktail session is a great time for the bride and groom to take photos with guests and mingle, capturing moments that might not be possible during the more formal parts of the wedding.
You can include the cocktail session on the guest page as steps below:
- Go to Settings from the side menu.
- Scroll down to Guest Page and click on the Guest Page Info.
- At the Cocktail Time field, add your cocktail session information.
- Click Preview button to preview the changes.
- Make sure you click Save button to save the changes before you exit.


d) Itinerary
Providing a detailed itinerary helps guests know what to expect and can eliminate confusion about when and where events will take place. This can reduce stress and make the wedding day more enjoyable for everyone.
You can include the wedding itinerary on the guest page as steps below:
- Go to Settings from the side menu.
- Scroll down to Guest Page and click on the Guest Page Info.
- At the Itinerary field, add your program information.
- To formatting the text in the itinerary field, you can add the code below:
- To bold text: add <b> at the beginning of text and make sure you put </b> at the end of the text.
- To italic text: add <i> at the beginning of text and make sure you put </i> at the end of the text.
- Click Preview button to preview the changes.
- Make sure you click Save button to save the changes before you exit.


Greeting Message
a) Personalised greetings with dynamic variable
Including personalized greetings on a wedding guest page can make guests feel valued and welcomed to the event, for example guest name. It adds a personal touch to the overall experience and can set the tone for the wedding. It shows that the couple has put in extra effort to make their guests feel special and appreciated, which can go a long way in creating a positive atmosphere for the event.
Add personalised greetings with dynamic variable on the guest page as steps below:
- Go to Settings from the side menu.
- Scroll down to Guest Page and click on the Guest Page Info.
- Copy and paste the Guest Name from dynamic variables into the Greeting field.
- Click Preview button to preview the changes.
- Make sure you click Save button to save the changes before you exit.
- Please note that you will only see the name of the guest in the guest list module when you preview their profile.


Multi-Languages
a) Ensure that all guests feel welcome and valued
Including multiple languages on a wedding guest page can be very beneficial for guests who may not be fluent in the primary language used on the page. This can help guests feel more comfortable and included, and it shows that the couple values diversity and inclusivity.
Add a new language page on the guest page as steps below:
- Go to Settings from the side menu.
- Scroll down to Guest Page and click on the Guest Page Info.
- Click the + add new button at the top right.
- Select a new language template you want to add and click Confirm button.
- At the moment, we only offer templates in Traditional Chinese, Simplified Chinese, and Malay. However, you can create a personalised template by entering all the information in your preferred language.
- Click Preview button to preview the changes.
- Make sure you click Save button to save the changes before you exit.


Guest Page Settings
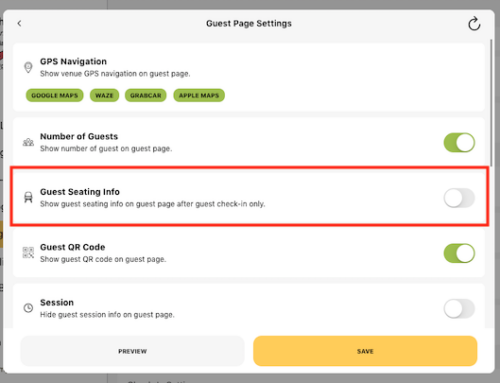
a) Enable / Disable Informations
By tailoring the information to our preferences, we can ensure that the guests have all the necessary details about the wedding that are relevant to them. For example, if we have a lot of guests who will be traveling from out of town, we may want to include information about nearby hotels and transportation options. On the other hand, if most of our guests are local, we may want to focus more on the wedding timeline and itinerary.
- Go to Settings from the side menu.
- Scroll down to Guest Page and click on the Guest Page Settings.
- You can choose to show or hide specific information on the guest page as per your preferences.
- Click Preview button to preview the changes.
- Make sure you click Save button to save the changes before you exit.

b) Background Image
Including wedding photos on the wedding guest page background can help to add a personal touch and help to make the guest page more visually appealing and engaging for guests.
- Go to Settings from the side menu.
- Scroll down to Guest Page and click on the Guest Page Settings.
- Upload a background image.
- Click Preview button to preview the changes.
- Make sure you click Save button to save the changes before you exit.

c) Attachements
Including a floorplan for a wedding can help guests navigate the venue and find their way around more easily. It can also provide them with a sense of the layout and flow of the event, which can help them plan their movements and interactions more effectively. For example, they may want to know where the bar is located, where the dance floor is situated, or where the restroom facilities are located.
- Go to Settings from the side menu.
- Scroll down to Guest Page and click on the Guest Page Settings.
- Upload a floor plan in PDF or image file types.
- Click Preview button to preview the changes.
- Make sure you click Save button to save the changes before you exit.

Guest Page Themes
Choosing a theme design according to our preference on the guest page can help create a cohesive and visually appealing representation of our wedding. It allows us to express our style and personality, and create a memorable experience for our guests.
There are several themes and designs to choose in the Guest Page Themes. To change the guest page theme, follow these steps:
- Click on the Settings from the side menu of your wedding account.
- Scroll down to Guest Page and click on the Guest Page Theme.
- Select a page theme you like.
- Click the preview button to preview the theme.
- Click Save button to finish.


